Building an Effective LLM Learning Environment with Jupyter, VS Code, and the OpenAI API

Let’s say you want to board the LLM hype train but don’t want to shell out $20 a month for the fancy version of ChatGPT. You can learn more and save a few bucks by setting up your notebook environment using the Open AI API and VS Code.
In this post, we’re going to use several different technologies.
Visual Studio Code
I use VS Code for nearly everything. For me, VS Code is usually more efficient than the full Visual Studio. It’s a great way to get started with notebooks.
Jupyter Notebooks
Jupyter Notebooks are a standard tool for data analysis. It’s like combining a note-taking app with a code execution environment. Jupyter Notebooks are also integrated into various data science and analysis tools. We’re going to run our notebooks in VS Code.
Python
I don’t spend much time in Python, but it’s a common language for data analysis. Sometimes, it’s easier to learn a new language to do something than to try and shoehorn your favorite language into a new application. If you’re not into Python, the Open AI API is a Rest API, and you’re welcome to use Polyglot Notebooks with C# instead.
Open AI API
Instead of ChatGPT, you can use the Open AI API to generate text. This gives you more control over your prompts, allows you to customize system messages, and gives you control over how imaginative the AI is when generating text. It’s also much cheaper than ChatGPT because the API is consumption-based. Each call is a fraction of a penny, and you can pick which model you want to use. This is the cheapest way to interact with GPT v4.
Setup Your LLM Notebook Environment
Step 0: Install VS Code
We will assume you already have VS Code installed, but if you don’t, head over to the VS Code Website and install it.
Step 1: Install Anaconda
Anaconda is a Python distribution that includes many of the tools you’ll need to get started with data analysis. It’s the easiest way to get Python and Jupyter Notebooks on your machine. You can download it from the Anaconda Website.
Once you have Anaconda installed, open up the Anaconda Navigator. This will let you customize your installation and add packages.
Step 2: Install Anaconda Packages
You’ll also need to install two additional packages. Go to the Environments tab from the navigator, click base(root), and search for the openai and python-dotenv packages. Install both of these using the navigator. You may need to update your indexes before you can find the packages.
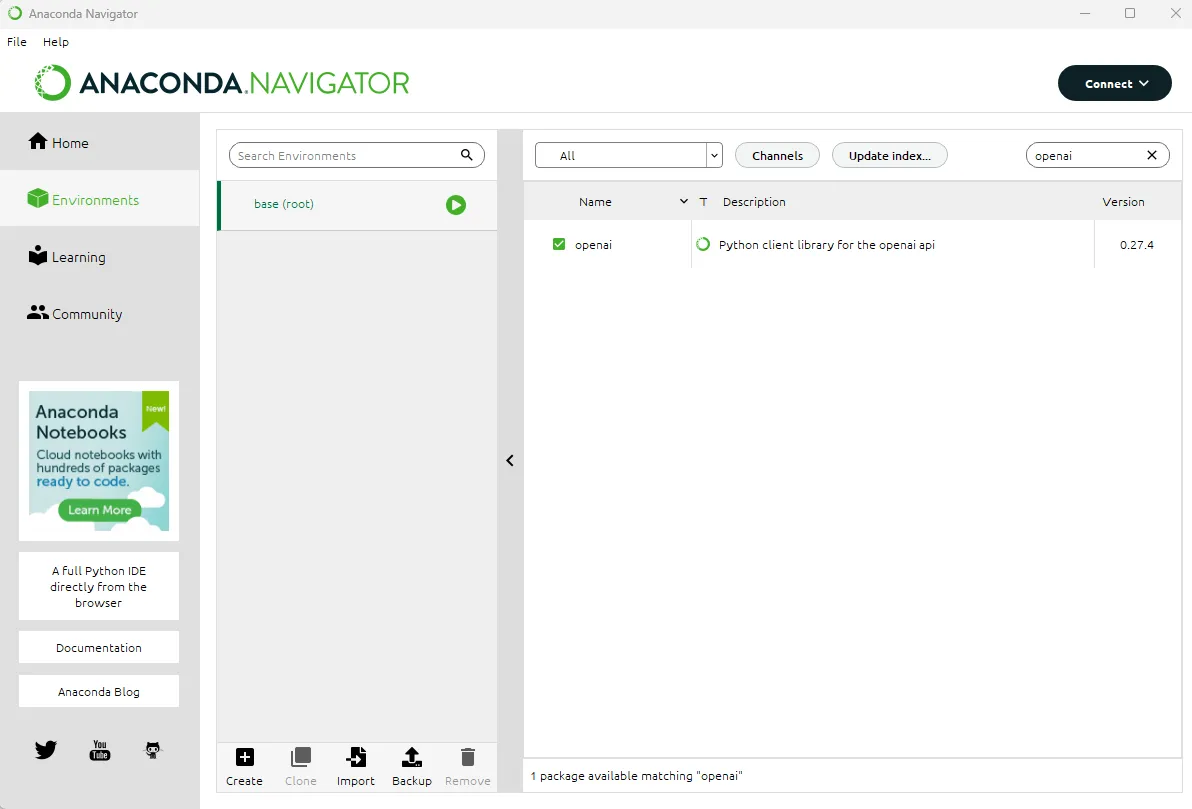
The OpenAI package is a library to interact with the Open AI API. The python-dotenv package is a library to read environment variables from a file. We’re going to use this to store our API key.
Step 3: Install VS Code Extensions
Next, install the Python and Jupyter extensions in VS Code. You can do this by clicking on the extensions tab in VS Code and searching for Python and Jupyter.
Python Extension ](assets You can also run Jupyter directly from Anaconda Navigator if you don’t want to mess around with VS Code.
Step 4: Hello Python
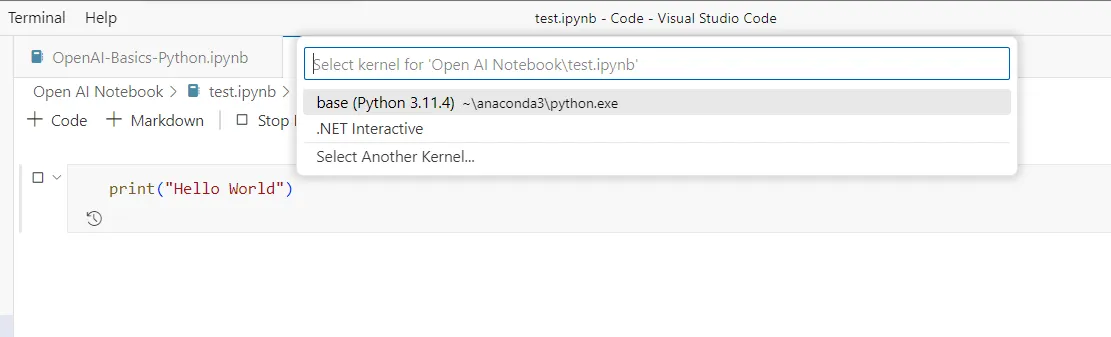
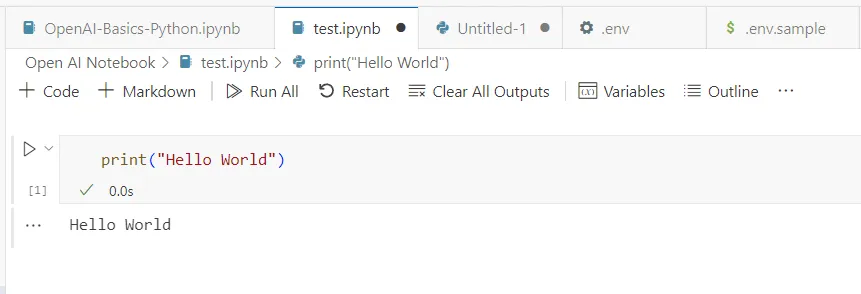
Create a new notebook in VS Code. You can do this by opening the command palette (ctrl+shift+p) and searching for Jupyter: Create New Blank Notebook. After that, enter print("Hello World") into the first cell and run it. You will be prompted to select a Python interpreter. Select the one that you installed with Anaconda.
You should see the output in the cell below.
At this point, you’re ready to start using the Open AI API.
Step 5: Get an Open AI API Key
You’ll need an Open AI API key to use the API. If you don’t already have an Open AI account, you can use your Microsoft login to authenticate. Once you have an account set up, head to the API page to get your key.
You will only see it once, so copy it somewhere safe, like a password manager.
You’ll need to set up a payment plan. Go to the billing page and buy some credits. You can also set up usage limits to ensure you don’t exceed your budget. Five to ten dollars should be enough to get started.
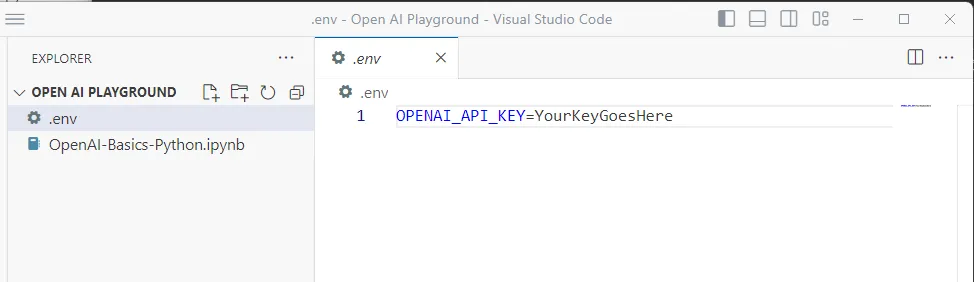
Step 6: Add Your API key to an environment file
You don’t want to store your API key in your notebook. Instead, you can store it in a .env file. The python-dotenv you installed in step 2 allow this.
Step 7: Authenticate to the Open AI API
In the notebook you created in Step 3 replace the first cell with the following code
import os
import openai

from dotenv import load_dotenv, find_dotenv
_ = load_dotenv(find_dotenv())

openai.api_key  = os.getenv('OPENAI_API_KEY')
This code imports the libraries we need, loads the environment file, and sets the API key.
Step 8: Create a function that calls the Open AI API
Create a new cell and add the following code.
def get_completion(prompt, system="You are a helpful assistant", temperature=0, model="gpt-3.5-turbo"):
    messages = [{"role": "user", "content": prompt}, {"role": "system", "content": system}]
    response = openai.ChatCompletion.create(
        model=model,
        messages=messages,
        temperature=temperature, # this is the degree of randomness of the model's output
    )
    return response.choices[0].message["content"]
This function takes a few parameters and calls the Open AI Chat Completion endpoint. This will give us an easy way to call the API from our notebook.
When working with the Open AI API, you can set a few important parameters.
messages
When calling the Open AI API, there are several types of messages you can send in. The primary prompt type is the user prompt {"role": "user", "content": prompt}. This is the main request you are sending to the LLM.
You can also add additional prompts to help the LLM give you the correct tone. A useful prompt is the system message {"role": "system", "content": system}. This is a prompt that you can use to set the tone of the response.
temperature
The temperature parameter controls how random the response is. A temperature of 0 will give you the most predictable response. A temperature of 1 will provide you with the most random response.
If you want Open AI to generate a contract, then go for a low temperature. If you want Open AI to generate a poem about wombats, then go for a high temperature.
model
Different model families have different capabilities, response times, and costs. The gpt-3.5-turbo model is a good default model. The gpt-4 model is also available but is slower and more expensive. You can mix and match your models in your applications depending on your needs.
You can find more information about the different models on the Open AI API Reference.
Step 9: Start Prompting
This is what we’ve been waiting for; let’s start prompting the LLM. Create a new cell and add the following code.
text= f"""Wombats eating ice cream in a bathtub.
"""
prompt= f"""Please write a poem about the text delimited by triple backticks below. \
```{text}```"""

system="You are an award winning poet known for your funny children's poems."

response = get_completion(prompt, system, 0.8, "gpt-4")
print(response)
This code defines a prompt and adds some text to it. When building prompts, you generally put the user input into a delimited text block. This makes it easier to instruct the LLM and prevent prompt injection.
We also include a system message, set the temperature fairly high, and use the gpt-4 model for maximum quality.
Go ahead and run your cells. If you have set everything up correctly, you should see a poem about wombats eating ice cream in a bathtub.
Experiment and Have Fun
You can experiment with different prompts and models now that you have your own LLM notebook environment. Whether you want to generate a contract, write a poem, or draft the next great American Novel, you have the tools to get started.